
DG New Tickets Automation
Automations
In your Freshdesk account go to Admin section and open Automations.

Ticket Creation Rules
In Admin > Automations make sure you are on the Ticket Creation tab

Add New Rule
Click New rule to add a new automation.

Name
Give a name to the automation: DG New Tickets Automation

Conditions
Add the following condition:
In Tickets if Status Is
Open
In Tickets if Source Is
Email

This condition will match any ticket that is created and the status is Open.
Automation ConditionsYou could also add other conditions to the automation rule. These conditions do not define what tickets will actually be automated, they only restrict what tickets will be sent to DigitalGenius Flow for potential automation. Then inside Flow you have AI and logic that defines what tickets will be automated. So you can think of the Freshdesk automation conditions as a basic filter on what tickets will be sent to Flow but inside your flow you can then apply more advanced filters.
Webhook Action
Now we are going to set up an action that will send this ticket to the DigitalGenius platform.
In the choose action dropdown select Trigger webhook.

For the Request type select POST.

For the URL put either https://flow-server.eu.dgdeepai.com/execution or https://flow-server.us.dgdeepai.com/executiondepending on whether your DigitalGenius account is in US or EU region respectively. This is something you can see in the URL of your DigitalGenius dashboard - us.digitalgenius.com or eu.digitalgenius.com.

Authentication
Toggle Requires authentication to on. This will expand the authentication section. For the authentication type keep I have username & password selected.

For the Username and Password, we are going to use API Key and Secret from the DigitalGenius dashboard. Follow the steps in API Key/Secret. Put the API Key into the Username field and API Secret into the Password field.

Keep Add custom headers toggled off and Encoding as JSON.
Content
In the Content section select Advanced.

In the content text area enter the following but replace the {REPLACE WITH FLOW ID} with the ID of the main flow on the DigitalGenius dashboard AND {{freshdesk DOMAIN}}with the domain from the URL:
{
    "action_id": "replace with MASTER FLOW ID",
    "external_id": "{{ticket.id}}",
     "origin": {
        "subdomain": "{{CRM DOMAIN}}",
        "type": "freshdesk"
    },
    "inputs": {
        "ticket_id": "{{ticket.id}}",
        "subject": "{{ticket.subject}}",
        "description": "{{ticket.description_text}}"
    },
    "conversation": {
        "external_id": "{{ticket.id}}",
        "title": "{{ticket.subject}}",
        "name": "{{ticket.requester.name}}",
        "email": "{{ticket.from_email}}",
        "messages": [
            {
                "external_id": "{{ticket.modified_on}}",
                "timestamp": "{{ticket.created_on}}",
                "from": "customer",
                "sender_name": "{{event_performer.name}}",
                "sender_email": "{{event_performer.email}}",
                "content": "{{ticket.subject}}. {{ticket.description_text}}"
            }
        ]
    },
    "enable_relaunch_on_inputs_change": false
}
Add the JSON in the Content (Advanced) section:

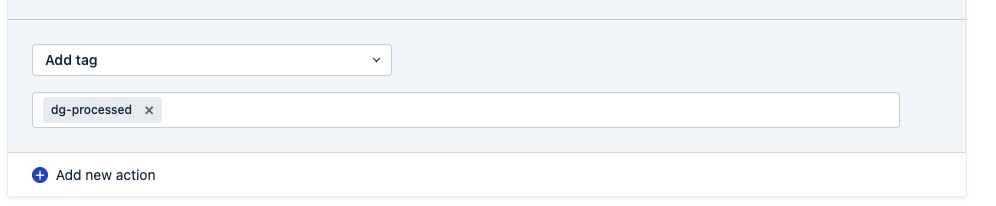
Add one more action to add "dg-processed" to all the tickets sent to DigitalGenius:
Save
Click save and preview and you should see a preview pop-up like this.

Save and enable the automation.
Check the Automation
After saving the automation, you will be redirected to the list with automation rules. Find the automation you just added and double-check that it is enabled. You should see a green toggle with a check when the automation is enabled.

Rule Execution Type
Check what rule execution type you have enabled.

If it is set to Executing first matching rule then click the cog to change it to Execute all matching rules.

Rule execution order and typeExecuting first matching rule will stop checking other automations as soon as it finds the first automation with matching conditions. Therefore we don't recommend using this as it is likely that some automations will not run.
Execute all matching rules will check conditions of every automation and run all of the automations that match.
In the DigitalGenius Dashboard, Find the Modules page, and create a new Connection in the Freshdesk Module:
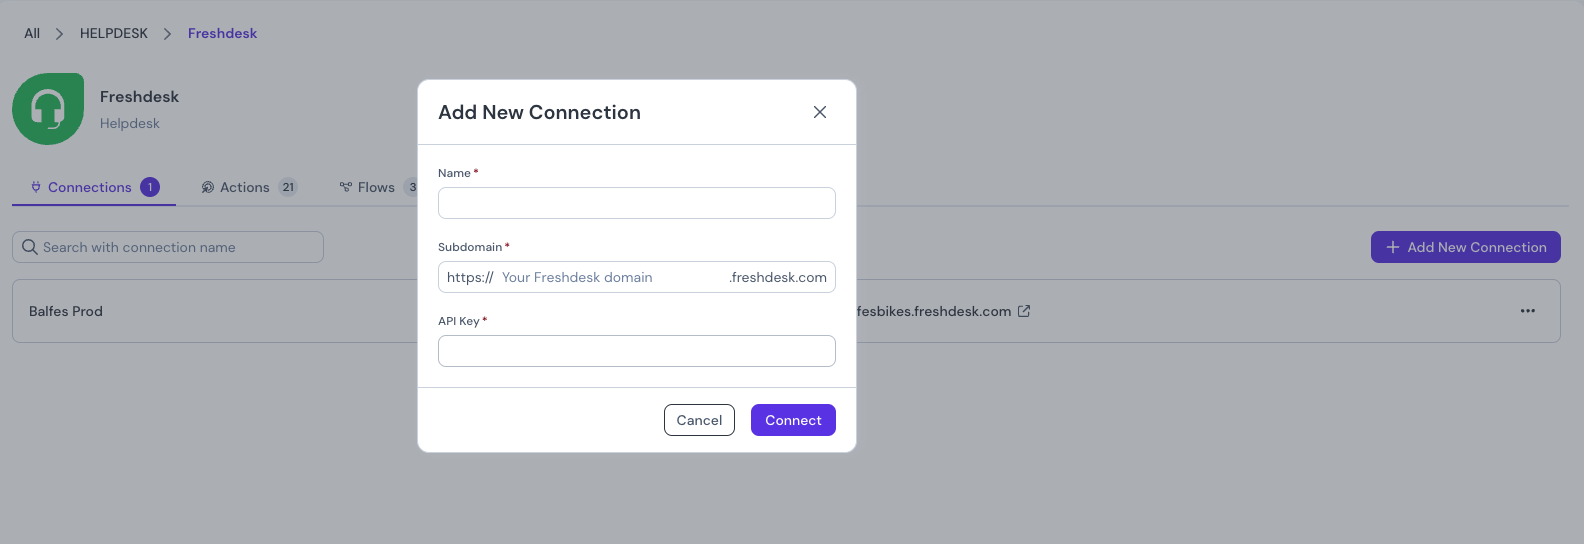
Name the Connection using the naming convention: [Name of the customer] [Prod/Sandbox]. For example, if it's a production connection for Balfes, the connection name will be Balfes Prod.
Add the subdomain and API Key. Here is how you can find the API key.
Updated 8 months ago