
Connect to MASTER FLOW - Zendesk Trigger
In order for DigitalGenius to receive tickets from Zendesk you need to configure a trigger in your Zendesk account.
Whenever a ticket is created or updated, Zendesk checks all the triggers conditions for a match. If the trigger's conditions match the ticket update then the trigger's actions are performed. DigitalGenius uses a Zendesk trigger to be notified whenever a ticket is being created/updated so it can then run a flow for this ticket.
Inside this trigger you can also specify rules for what tickets and messages will be sent to DigitalGenius. This enables you to filter out tickets that you do not want to be passed on to DigitalGenius for any automation. For example a common practice for trigger rules is to exclude any channels that are not part of the automation scope, for example: phone.
Add New Zendesk Trigger
To add a new Zendesk trigger for DigitalGenius go to Zendesk Settings -> Go to Admin Center -> Object and rules -> Triggers. Click Add Trigger.
Trigger Name: DG Ticket Created/Updated Trigger
Trigger Description: Send ticket comments to DigitalGenius
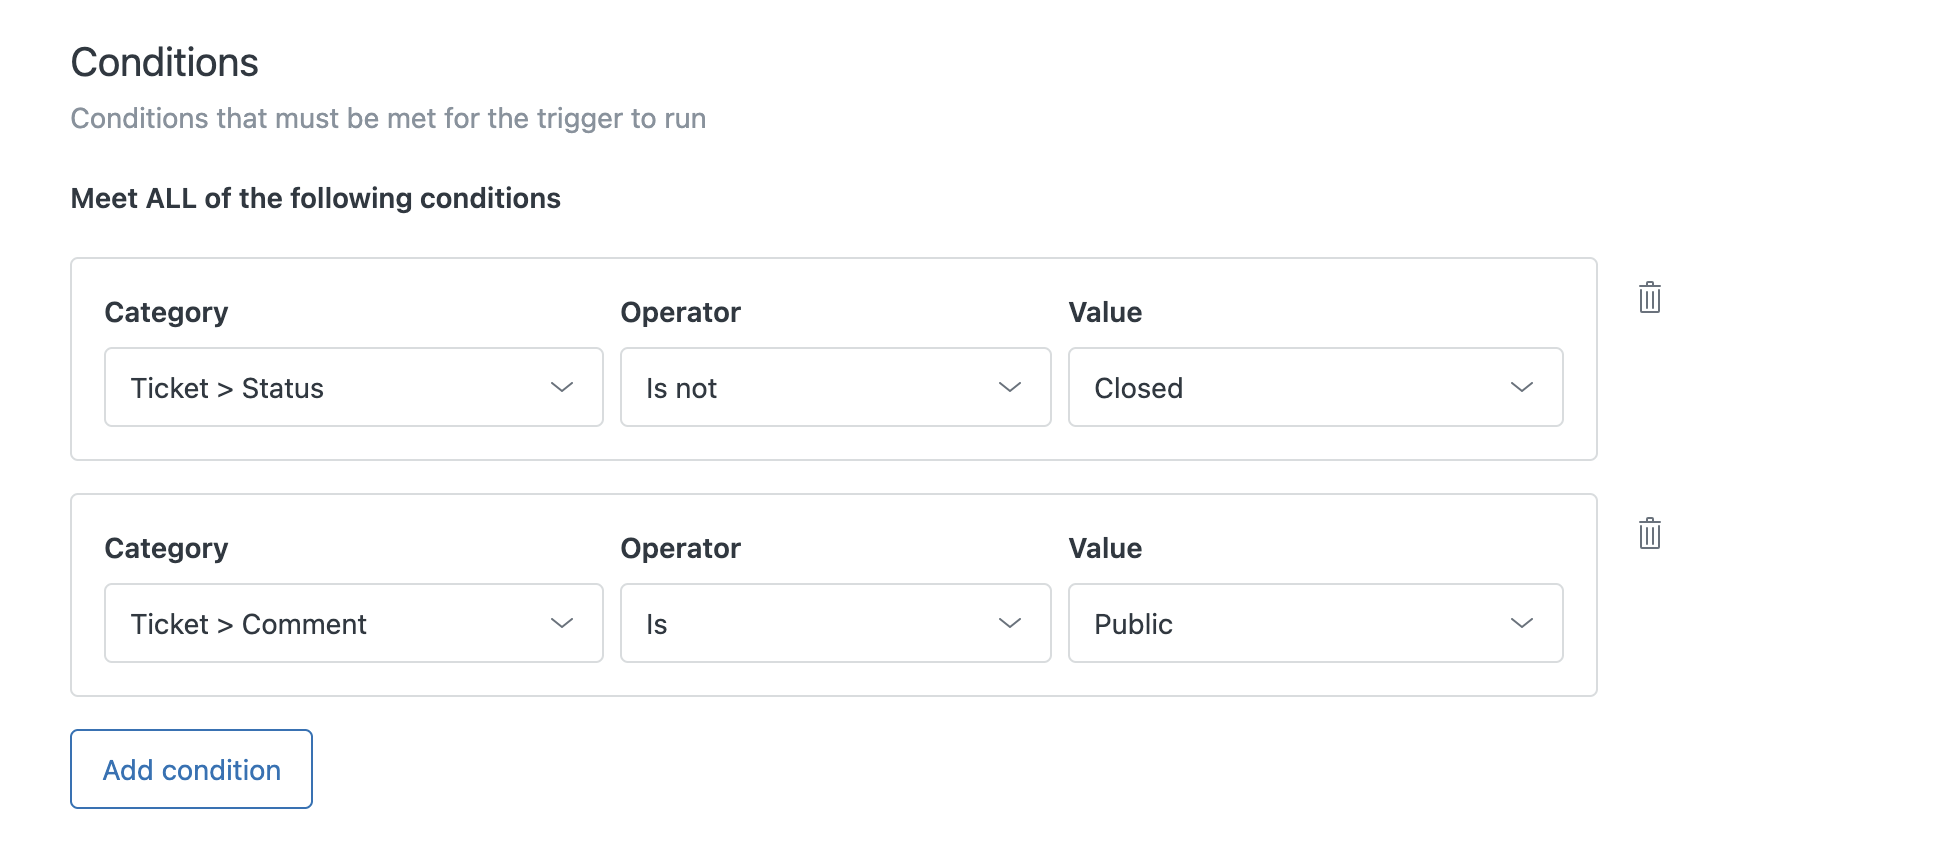
Conditions
Use the conditions section to filter out what tickets/messages should be sent to DigitalGenius. Some of the common conditions are the following:
- Status
The status condition will be set up to Status Is Not Closed, this is to make sure that all the comments are sent. to DG and are available in the Conversation page.
- Ticket Comment - Public
It is very important to add Ticket->Comment is Public condition so Zendesk sends us requests only when a public message is added to the ticket.
- Channel
Although DigitalGenius can be used to automate resolutions of any type of ticket you might want to start with some channels and then later expand it to the rest. Use conditions on the Channel field to specify what channels should be in scope for automation. You will probably want to add more than one channel therefore use the Meet ANY of the following conditions section to add multiple entries. By default DG would add: Email, Web Form, API.
These are some of the minimum conditions to add, but often you would extend it with your business logic conditions such as filtering out tickets that contain a particular tag or have a certain status.
t is very important to add Ticket->Comment is Public condition so Zendesk sends to us requests only when a public message is added in the channel
More information about conditions that can be added to Zendesk triggers can be found here.
Notify Target Webhook
In the Actions section we want to notify DigitalGenius that a new event has occurred for this ticket. Therefore the core action that needs to be added is of Notify by > Active Webhook.
When you add the Notify by > Active Webhook action select the webhook target that you have created early in Create Webhook.
If you selected the right target you should then see the JSON body text area come up. For the JSON body enter the following but replace the {REPLACE WITH FLOW ID} with the ID of the main flow on DigitalGenius dashboard:
{
  "action_id": "{REPLACE WITH FLOW ID}",
   "external_id":"{{ticket.id}}",
   "inputs":{
      "user_email":"{{ticket.requester.email}}",
      "ticket_id":"{{ticket.id}}"
   },
  "origin": {
        "subdomain": "CRM DOMAIN",
        "type": "zendesk"
    },
   "conversation":{
      "external_id":"{{ticket.id}}",
      "title":"{{ticket.title}}",
      "email":"{{ticket.requester.email}}",
      "messages":[
         {
            "external_id":"{{ticket.latest_public_comment.id}}",
            "timestamp":"{{ticket.updated_at_with_timestamp}}",
            "from":"author",
            "author":{
               "email":"{{current_user.email}}",
               "role":"{{current_user.role}}"
            },
            "sender_name":"{{current_user.name}}",
            "content":"{{ticket.latest_public_comment}}"
         }
      ]
   }
}
For example, if the ID of your main Flow is 12345abcd , the CRM is Zendesk and the CRM domain is dgdemo then the complete JSON configuration should look like this:
{
  "action_id": "12345abcd",
   "external_id":"{{ticket.id}}",
   "inputs":{
      "user_email":"{{ticket.requester.email}}",
      "ticket_id":"{{ticket.id}}"
   },
    "origin": {
        "subdomain": "dgdemo",
        "type": "zendesk"
    },
   "conversation":{
      "external_id":"{{ticket.id}}",
      "title":"{{ticket.title}}",
      "name":"{{current_user.name}}",
      "email":"{{ticket.requester.email}}",
      "messages":[
         {
            "external_id":"{{ticket.latest_public_comment.id}}",
            "timestamp":"{{ticket.updated_at_with_timestamp}}",
            "from":"author",
            "author":{
               "email":"{{current_user.email}}",
               "role":"{{current_user.role}}"
            },
            "sender_name":"{{current_user.name}}",
            "content":"{{ticket.latest_public_comment}}"
         }
      ]
   }
}
external_id = is always the ticket id, we need this external Id to be ticket Id because in this way we will be able to search in executions by ticket ID.
inputs = this field is the IDs of the MASTER FLOW inputs.
Other Actions
In addition to the Notify Target action, which is the core action to make sure DigitalGenius receives the ticket events, you might want to add some additional actions.
We add also an Add tags action to tag all the tickets that are forwarded to DigitalGenius with dg-processed tag. This is useful for reporting purposes as you can then use this tag to identify all the tickets that were in scope for automation.

Add Tags Action
Save Trigger
Once all the conditions and actions are created or updated, do not forget to save the trigger by clicking the Create /Save button.
Updated 8 months ago