
Campaigns
Campaigns enable you to reach customers with timely, targeted messages exactly when it matters most. Reduce cart abandonment, increase conversions, and unlock upsell opportunities - all powered by real-time triggers and smart segmentation.
Available for Shopify stores, Campaigns allow you to configure when messages appear by defining conditions based on a combination of browser events (such as current URL or number of visits) and Shopify-specific data. This makes it possible to engage customers at precisely the right moment in their shopping journey.
Getting Started
Prerequisites
Before you take your first steps with Campaigns, there are two requirements your CSM can help you with:
- Ensure the Campaigns feature is enabled on your Dashboard account.
- Ensure the DigitalGenius Shopify app is installed on your Shopify store.
First steps
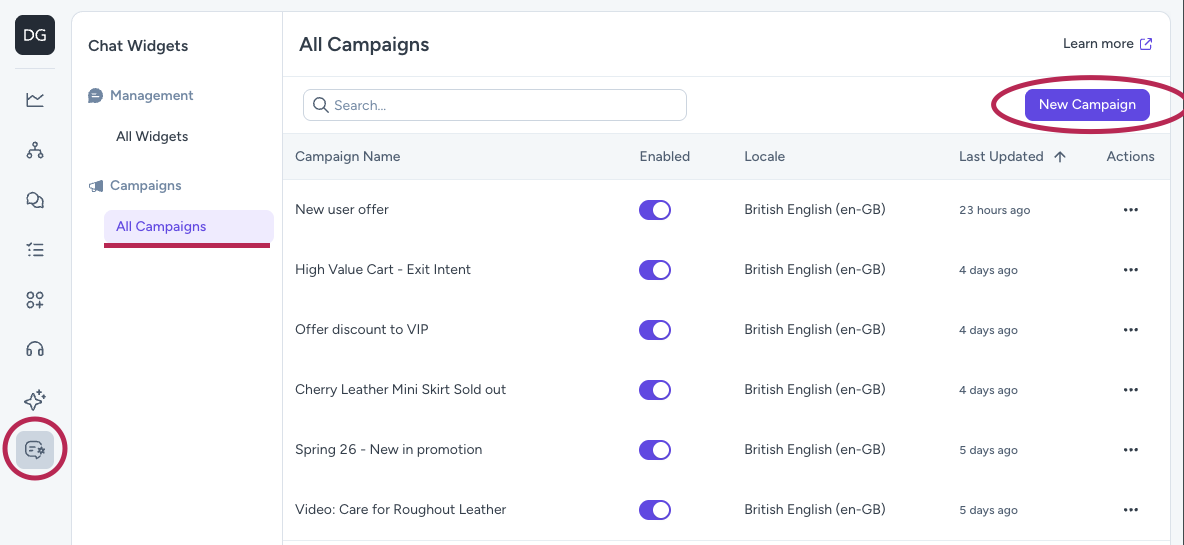
Log in to the DigitalGenius Dashboard and navigate to Campaigns by clicking on the Chat Widget item in the sidebar, navigating to All Campaigns and clicking on the New Campaign button.
Give your campaign a name and click on the Create Campaign.
Once submitted, you will be redirected to the Campaign detail page. Each campaign is made up of six steps:
- Conditions - Rules that determine when a campaign fires. See the
Conditionssection for details. - Message - The message shown to the customer. See the
Messagesection for details. - Display - Specify which devices the campaign appears on (desktop or mobile) and optionally add a delay before it is displayed once all conditions have been met. Selecting desktop also covers tablet devices. See the
Displaysection for details. - Content - optional products, discount codes, or videos. See the
Contentsection for details. - Publishing & Schedule - Publish a Campaign, save a draft of schedule it to start later. See the
Publishing & Schedulesection for details. - Link a Campaign to a Widget - Once you have created your Campaign you can assign it to the associated widgets in the Dashboard Widget Builder. See the
Linking a Campaign to a Widgetsection for details.
Conditions
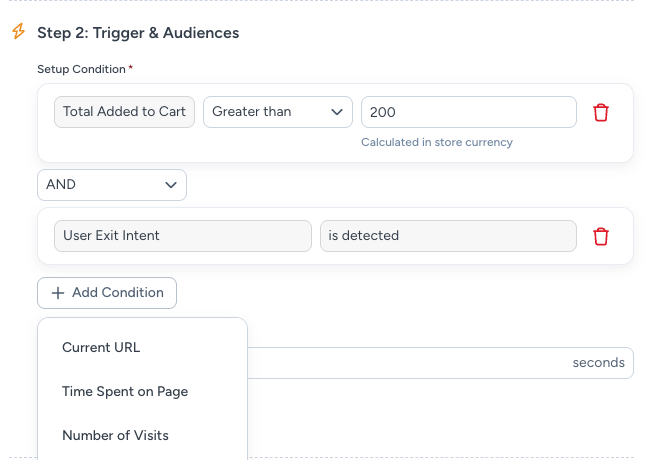
Campaigns are triggered by one or more conditions. Conditions can be combined using AND / OR logic.
The following table explains all of the available conditions:
| Trigger | Description | Operators |
|---|---|---|
| Current URL | Match the page the customer is on. You can add multiple urls here | contains, is, is not, starts with, ends with |
| Time Spent on Page | Fire after the customer has been on the page for X seconds | greater than, equal to |
| Exit Intent | Fire when the customer shows signs of leaving | — |
| Number of Visits | Target by how many times the customer has visited | greater than, less than, equal to |
| Total Value in Cart | Cart value threshold (calculated in store currency) | greater than, less than, equal to |
| Number of Items in Cart | Number of items in the Cart | greater than, less than, equal to |
| Product Tags in Cart | Shopify tags present on products currently in the customer's cart | equal to, not equal to, contains |
| Currently Visited Product | Shopify tags present on the product page being viewed | equal to, not equal to, contains |
| Viewed Product Tag Count | Number of unique products viewed with any of the selected Shopify tags. | greater than, less than, equal to |
| Number of Orders | Customer's lifetime order count | greater than, less than, equal to |
| Total Spent | Customer's lifetime spend | greater than, less than, equal to |
| Customer Tags | Segmentation based on Shopify tags assigned to the customer | contains |
| Customer Country | The customer's location | equal to, not equal to, contains |
| Purchased Product Tags | Shopify tags present on the customers historical orders | equal to, not equal to, contains |
| Traffic Source | Match the referrer page url | equal to, not equal to, contains |
| Custom Condition | Match data passed from your own site, backend, CDP, loyalty provider, subscription platform, or CRM. See Custom Conditions. | Depends on value type |
For generated campaign configuration, Viewed Product Tag Count stores the selected tags under value.tags and the numeric threshold under value.count.
Exit intent — desktop: detected when the cursor moves to the top of the viewport or leaves the browser window.
Exit intent — mobile: detected by a fast upward scroll at the top of the page.
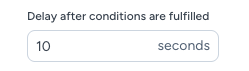
Delay after conditions are fulfilled
Once all conditions are met it's possible to delay the display of the campaign.
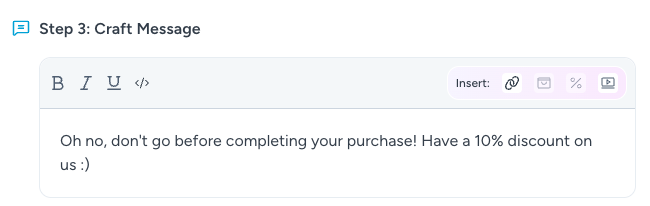
Message
Add a message for the user. You can format your message using the rich-text controls or choose to edit the raw html directly. The campaign message supports rich HTML content via the </> button.
Launch widget when campaign is clicked

The Launch widget when campaign is clicked toggle controls how the campaign behaves when the customer interacts with it. If the toggle is enabled then the campaign acts as a click-to-chat prompt. When the customer clicks the message, it is sent into the chat and the conversation opens automatically.
Display
Specify which devices the campaign appears on (desktop or mobile) and optionally add a delay before it is displayed once all conditions have been met.
| Option | Description |
|---|---|
| Delay | Wait X seconds after conditions are met before displaying the campaign |
| Device Type | Target Desktop, Mobile, or both |
Content
Discount Codes
Attach a Shopify discount code to a campaign. The customer sees a button labelled with the name you provide, and clicking it applies the discount to their cart.
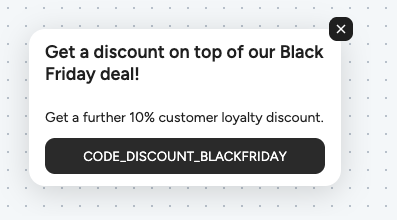
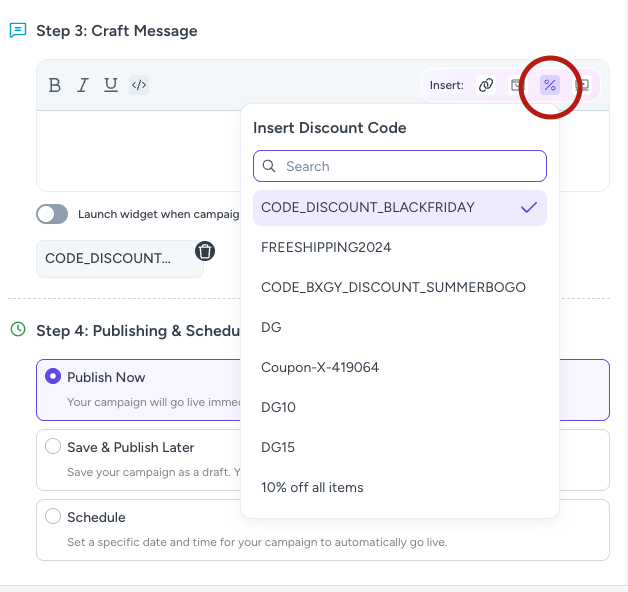
To select a discount code click on the % icon in the text editor in the Craft Message section and select a discount code you'd like to display in the Campaign. There is a limit of 1 discount code per campaign. The selected discount code will appear below the editor and can be removed by clicking on the x icon:
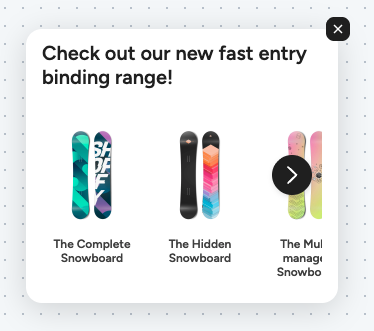
Products
Attach one or more products to display a recommendation. When multiple products are added, they render as a scrollable carousel.
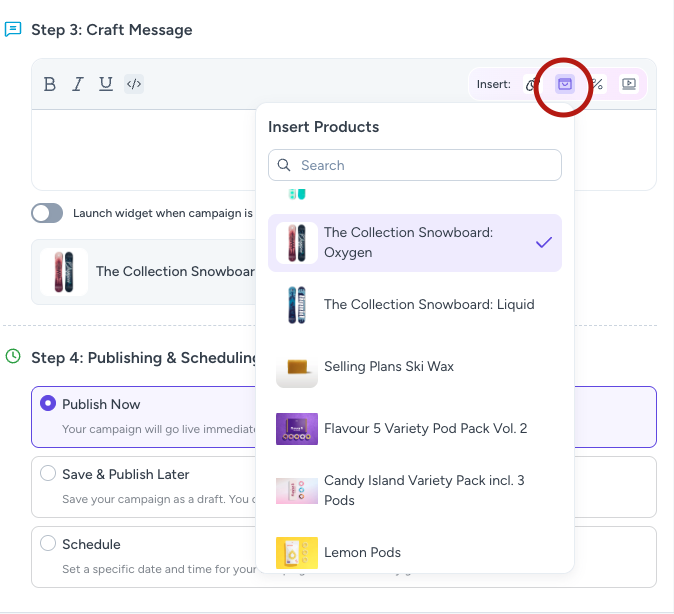
To select products click on the Shopping bag icon in the text editor in the Craft Message section and select as many products as you'd like to display in the Campaign. Selected products will appear below the editor and can be removed by clicking on the x icon:
Please note, stock levels of all products are checked before a campaign is shown to a user, any products that are out of stock will not be shown.
Video
Embed a video from the YouTube or Vimeo platforms. Just drop the complete video url in and we'll display it underneath message.

To select a video click on the video icon in the text editor in the Craft Message section and input a YouTube or Vimeo video url you'd like to display in the Campaign.
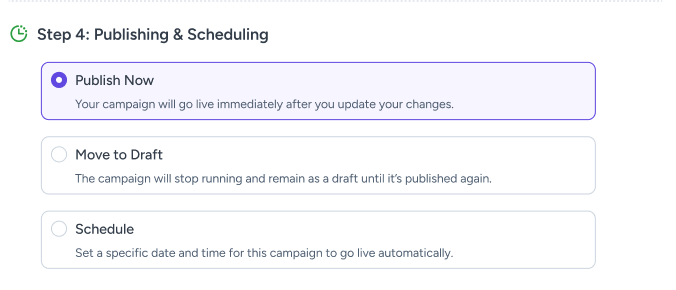
Publishing & Scheduling
Control when a campaign is active using the options in the Publishing & Scheduling section.
- Publish Now - The Campaign will go live immediately on any widget that has that campaign assigned to it
- Move to Draft - The Campaign will stop running and will remain as a draft until it is published again
- Schedule - Schedule a start date/time and optionally an end time
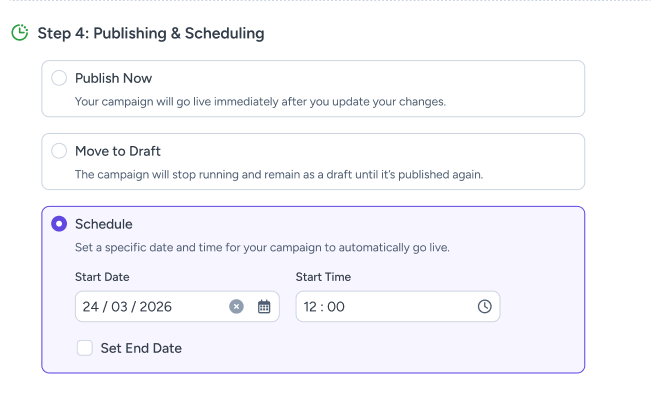
| Field | Description |
|---|---|
| Starts At | Date and time the campaign begins showing |
| Ends At | Date and time the campaign stops showing |
Leave either field blank for no start or end limit.
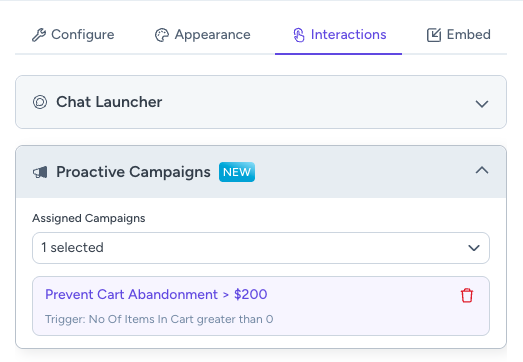
Linking a Campaign to a Widget
In order for your campaigns to be displayed to customers you need to link the campaigns to the widget you'd like them to appear for.
Go to the Dashboard Widget Builder by clicking on the All Widgets sidebar item. Go to the widget you would like to link a campaign and click on the Interactions tab. Click on the dropdown in the Proactive Campaigns section and select the campaigns that you would like to link to that widget. Click on the Save Widget button. All done - the assigned campaigns will now appear for that widget.
Campaign Analytics
Each campaign automatically tracks the following metrics:
- Impressions — How many times the campaign has been shown
- Engagements — How many times the campaign has been clicked
- Conversions — Orders (or partial orders) attributable to a campaign. See below for details.
- Orders — Number of orders attributable to a campaign
- Total Revenue — Total revenue attributable to a campaign
- Conversion Rate — Calculated as orders ÷ engagements × 100
A summary of analytics across all campaigns is available in the Analytics section of your Dashboard.
Conversion Attribution
DigitalGenius attributes a conversion to a campaign when any of the following conditions are met:
- A customer clicked on a product recommended within a campaign and subsequently completed a purchase that included that item.
- A customer was shown a recommended product in a campaign, did not click the link at the time, but later purchased the product.
- A purchase was completed within 24 hours of a customer engaging with a campaign link, regardless of whether the order contains a product recommended by a campaign or a discount code provided by a campaign.
- A purchase was completed using a promotional code that originated from a campaign.
Custom Conditions
Custom conditions allow you to show campaigns based on data you pass to the chat widget yourself. Use them for targeting that is specific to your site, such as customer preferences, loyalty state, subscription state, account type, or values from your own backend.
Add custom values to window.DG_CHAT_WIDGET_CONFIG.customCampaignConditions, then create a Custom condition in the Campaign builder using the same field name.
window.DG_CHAT_WIDGET_CONFIG = {
  widgetId: 'your-widget-id',
  env: 'eu',
  customCampaignConditions: {
    favouriteColour: 'red',
    favouriteNumber: 5,
    favouriteAnimals: ['cat', 'dog'],
    likesPizza: true,
  },
};
The field name in the Campaign builder must match the field name in customCampaignConditions exactly. For example, favouriteColour and favouritecolour are different fields.
Supported Value Types
Custom conditions support four value types.
Boolean
Use Boolean for true or false values.
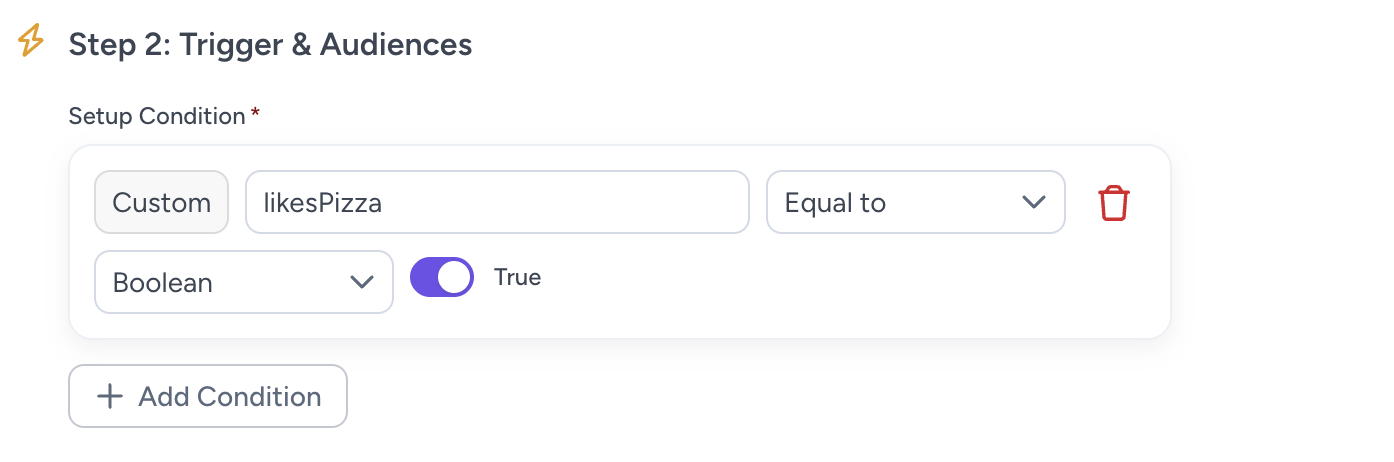
Displays when the page config includes:
customCampaignConditions: {
likesPizza: true,
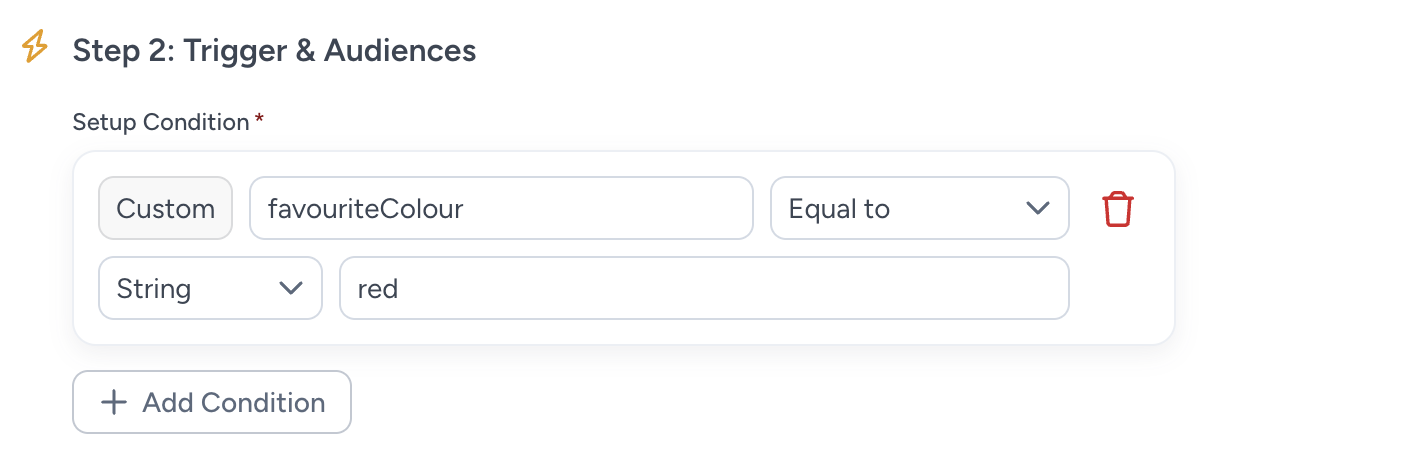
}String
Use String for a single text value.
Displays when the page config includes:
customCampaignConditions: {
favouriteColour: 'red',
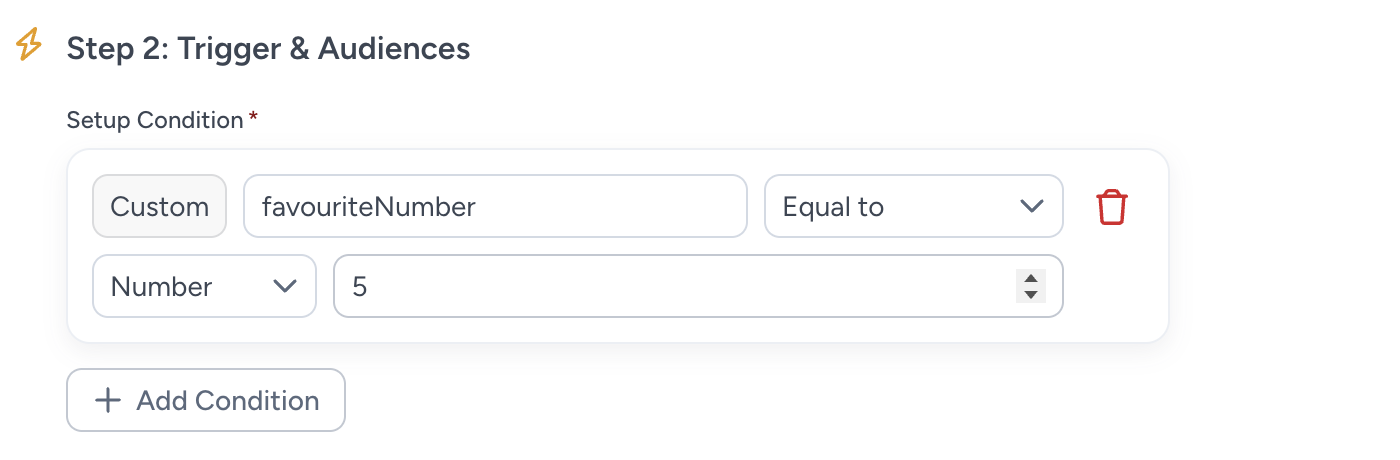
}Number
Use Number for numeric values.
Displays when the page config includes:
customCampaignConditions: {
  favouriteNumber: 5,
}
Array
Use Array when the value can contain multiple strings.
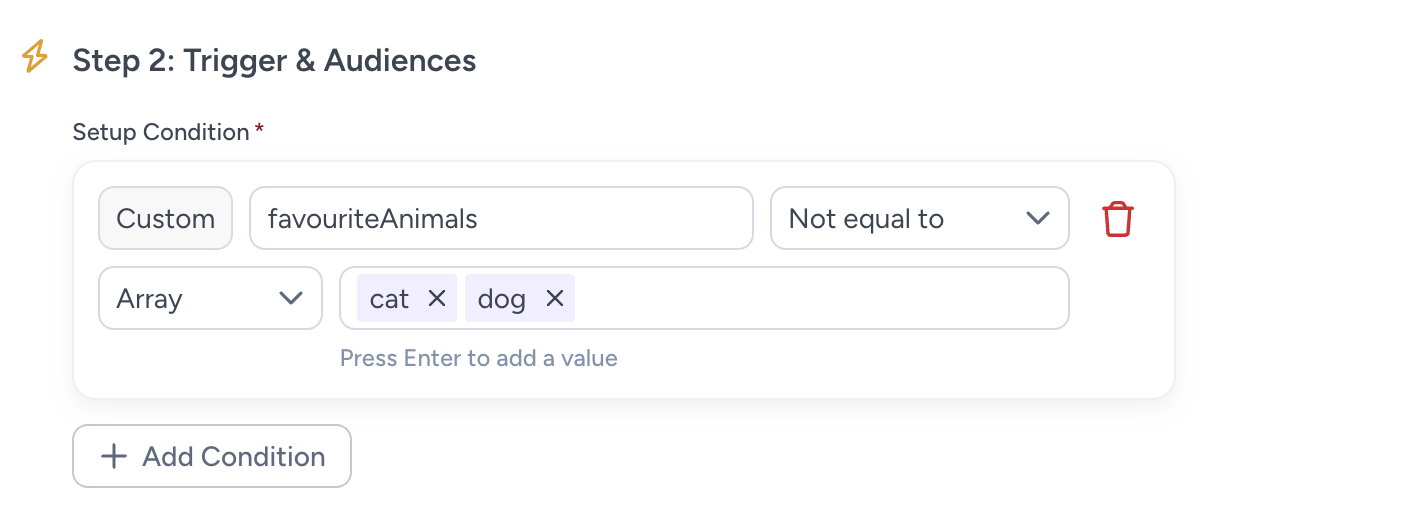
Displays when the page config includes:
customCampaignConditions: {
  favouriteAnimals: ['cat', 'dog'],
}
Setup Steps
- Add the custom values to
window.DG_CHAT_WIDGET_CONFIG.customCampaignConditions. - Make sure the values are set before
window.dgchat.init()runs. - In the Campaign builder, add a Custom condition.
- Enter the field name, choose the value type, choose the operator, and enter the value to match.
- Publish and assign the campaign to the widget.
You can combine custom conditions with other campaign conditions, such as current URL, time spent on page, device type, or traffic source.
Things to Check
- Use the correct JavaScript type:
true,5,'red', or['cat', 'dog']. - Do not pass numbers or booleans as strings. Use
5, not'5'; usetrue, not'true'. - Field names and string values are case-sensitive.
- Do not pass sensitive personal data, secrets, tokens, or anything that should not be visible in the browser.
Updated about 1 month ago